HOME | DD
 deborah3dle — easy water drop tutorial II

Published: 2011-02-03 01:24:00 +0000 UTC; Views: 9893; Favourites: 168; Downloads: 120
Redirect to original
Description
This is the second water drop tutorial I've featured.The first was done in a paint program using the applications that were available to that particular program.
This one is done strictly in Photoshop, using only two brushes.
~Remember, your water drop will use the colors of the background it rests on!~
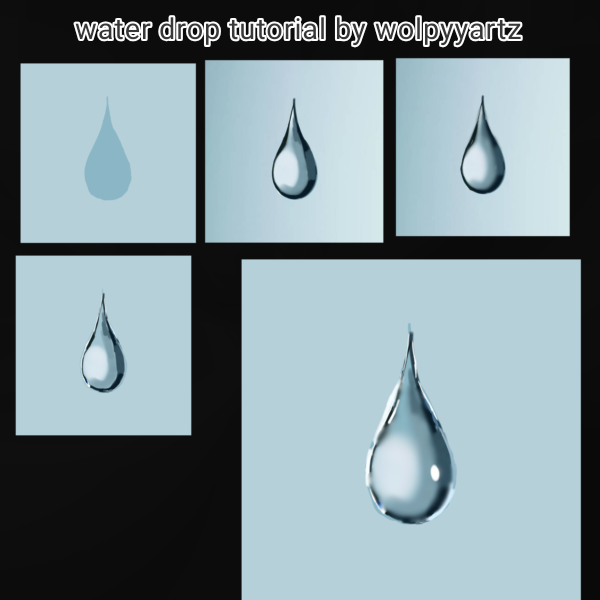
Step 1: Using a hard brush, pick a darker color of the background color your water drop will be resting on, and draw in the basic shape of your water drop.
Step 2: Still using a hard brush, next pick a lighter version of the background color.
*Important* - The general rule is the light source determines where the refracted light, or lighter part of the drop will go. Here the light source is coming from the upper right, so the lighter color will go opposite of the light source, hence, down in the lower left of the drop.
Step 3: Using a softer brush (I use the airbrush brush with slightly reduced opacity and flow) blend the light color into the darker color. Use the actual background color as needed.
Step 4: Back to the hard brush again. Using a much whiter color, add the highlight. The brightest highlight goes over the darkest area.
Using the dark color, add a small shadow to the lower left outer edge of the drop, if you want.
Again, this is a "standard" water drop, but looks pretty cool when it's applied.
Good luck and have fun.
~h~
Related content




Comments: 21

you made it so helpful even on my tablet i under stand it
👍: 0 ⏩: 0

this will very helpfull..
thanks for the tutorial,Hagge

👍: 0 ⏩: 1

Good to hear. You're welcome.
👍: 0 ⏩: 0


Thank you very much for the feature in your journal. I really appreciate that.
👍: 0 ⏩: 1

I'll have to try this! You explain it clearly and the image does a lot all on its own.
👍: 0 ⏩: 1
Good. HOpefully, future tutes will be the same.
👍: 0 ⏩: 1
Ooh, you have more planned?
👍: 0 ⏩: 1
Yes, actually. I discovered I have a small knack with drawing water and water related pictures...we'll see what I can get away with on that avenue.

👍: 0 ⏩: 1
You definitely do have that. 
👍: 0 ⏩: 1
Waterfalls....I can do that...and ice.
👍: 0 ⏩: 1
Ooh, ice definitely.
👍: 0 ⏩: 1

Thank you for sharing! This looks pretty simple, nice explanation
👍: 0 ⏩: 0