HOME | DD
 Iloon-Creations — Excalibur Foam Sword Tutorial
by-nc-sa
Iloon-Creations — Excalibur Foam Sword Tutorial
by-nc-sa

Published: 2013-04-06 22:23:17 +0000 UTC; Views: 21332; Favourites: 254; Downloads: 91
Redirect to original
Description
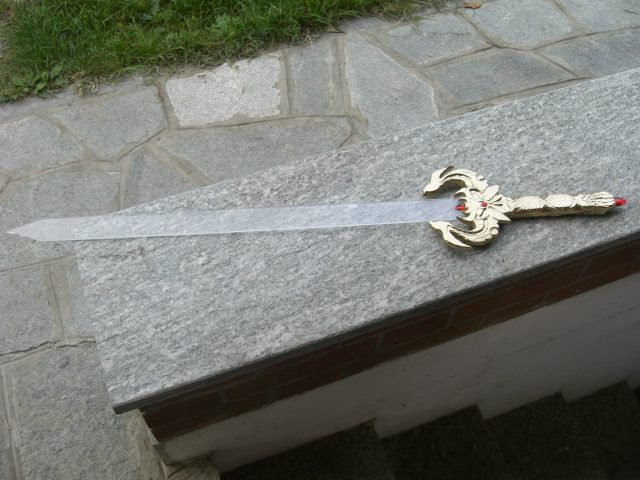
Here I am showing the proces of Excalibur from Sword Art Online (Alfheim arc.)This is a way for making a save lightweight sword for LARP, performances on stage or when you are on a low budget.
Materials used
- EVA Foam
- Scissors
- Contact adhesive
- Plastic stick
- Golden stretch fabric
- Silver acrylic paint mixed with blue or ocher yellow
- Brown acrylic paint
- Paint Brushes
- Super glue
- Blue strass stones
- I drawed the pattern on the foamsheet and cutted the pattern out, twice.
- Then I added some contact glue on both sides of the stick and lay it down in the center of the foam sword pattern. My stick was a little too short, so I added a small wooden stick on the end. I sandwiched the stick between both patterns of foam and let the glue cure for an hour.
- After the glue was cured I added some contact glue on the inside around the edges, on both sides, and waited for 10 min. After that I glued the 2 foampieces together.
- I used a soldering iron for adding deep layed, carved details and I cutted out pieces of foam (here in yellow) for upper laying details. The more layers of foam I added the higher the details will be. I simply glued the layers on each other with contact glue.
- Now comes the tricky part. I used a golden stretch lamé to cover all the foam with. I covered one side of the foam sword with contact adhesive and layed the stretch fabric over it. I slowly pushed the fabric on it, starting on the highest point, making sure the fabric will stick in every edge to show the details. I tried to prevent getting folds.
- After I glued the fabric down on one side, I let the glue cure for an hour an cutted off the extended fabric, around 5mm from the edge of the foam. I added some glue on de side of the foam and folded the fabric around the edge.
- I repeated the last two steps for the other side and let the glue cure for an hour after folding the edges.
- Now I painted the details. For the light colden edges I mixed ocher yellow with silver. For the blue parts I mixed silver with blue.
- With super glue I added some strass stones.
- After that I gived the sword a weathered look by dry brushing brown paint on it.
Done!
Tips and tricks
- Instead of scissors, you can also use a stanley knife, do what is the most comfortable for you. I cut neater with scissors than a knife.
- Be patient with contact adhesive, it works the best if you add glue on both surfaces and let it cure for around ten minutes. It will stick the pieces to each other immediately after those few minutes.
- If you have problems by glueing the fabric on the foam, you can also do it in parts. Like first adding glue on the hilt only and sticking the fabric on that part first. And then working further piece by piece.
- After you just added the fabric, some parts can look bulky even after pushing the fabric in the edges of the details. Just wait for 15 minutes and try to push the fabric back again. Sometimes it will keep look bulky or weird. Just leave it like that. When the glue is fully cured after a few hours, the foam will take it's old shape back and the fabric will stick neatly against the foam.
For questions don't hesitate to ask, I like to help you the best I can.
Follow me on Facebook"
Related content




Comments: 20

This looks pretty good for those who want to make a sword like that
👍: 0 ⏩: 0

Would hot glue work and would mode podge be a good idea?
👍: 0 ⏩: 1

Hot glue will work for gluing the foam pieces together.
Mod podge will only work if you seal the foam with a few layers of something like PVA glue (woodglue) mixed with a bit of wather

👍: 0 ⏩: 1
Oh alright! Thank you!
👍: 0 ⏩: 0


would this tutorial work for swords i wanted to use to spar with?
👍: 0 ⏩: 1
Yes it will ^^
This sword is totally save and durable. You can throw with it and it will survive.
👍: 0 ⏩: 1

Very helpful tutorial. Might I ask what brand of contact adhesive did you use?
👍: 0 ⏩: 1
Thank you. I used Bison Kit Universal Contact Glue.
But other brands like UHU Contact adhesive will do the job also.
👍: 0 ⏩: 0



This is... actually really cool. If I ever do a sword fight for a skit, I'll definitely use this tutorial. Thankyou so much for uploading!
👍: 0 ⏩: 0


i have never heard of using fabric to make part of sword *thumbs up*
👍: 0 ⏩: 0


An anime Sword Art Online well Sword Art Online 2. It's good👍🏾
👍: 0 ⏩: 0


Great tutorial! What thickness was the red foam you were using?
👍: 0 ⏩: 1
Thank you ^^
Around 4 mm (the yellow around 2 mm), but it has a very high density.
👍: 0 ⏩: 0