HOME | DD
 QTMarx — Layermakers
by-nc-sa
QTMarx — Layermakers
by-nc-sa
#automation #layers #clipstudiopaint #clip_studio_paint #autoaction #auto_action
Published: 2021-11-26 14:31:43 +0000 UTC; Views: 4082; Favourites: 10; Downloads: 14
Redirect to original
Description
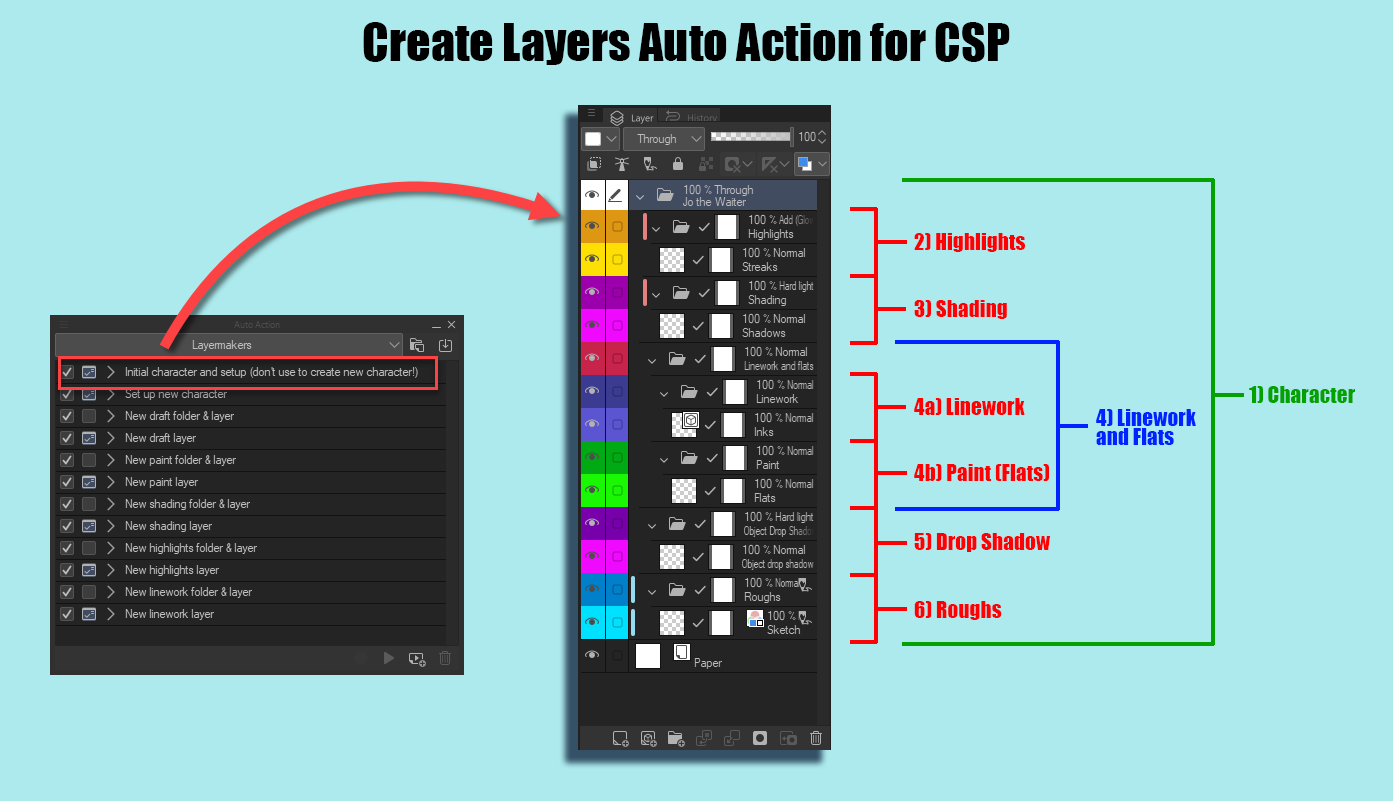
I've made an auto action for Clip Studio Paint that automatically creates a series of folders and layers for building a character. As well, there are also actions for adding more characters, and for adding each kind of folder and each kind of layer, complete with the masking and layer colour coding to keep them all sorted by type. To use this, download the ZIP file and extract the LAF auto action file. On the Auto Actions palette in CSP, click the three-line icon at the upper left, select Import set..., navigate to where you saved the LAF file, select it, and click Open. That should add this set to your Auto Actions palette.Let me explain the basic setup. All you have to do is create a new document and then run the initial setup action. When you run it, it creates a set of folders, subfolders, and their start-up layers; creates masks for each folder and layer; sets the blending mode for each folder; and colour codes each layer and folder to help you keep track of them. Everything is nestled into a single folder that you can collapse and expand, and which you are prompted to name during the process. It all happens in a second or two, saving you buckets of time.
A little about each folder...
1) Character: This is the overall container. When you're done working with one character, you can collapse the whole thing to keep it out of the way when you work on the next character, and expand it again if you need to make changes later. When this folder is created, you are prompted to name it; the idea being to name it after the character or object it's intended to contain.
2) Highlights: This folder's blending mode is set to Add (Glow) and contains a layer into which you can paint hair highlights, ambient edging, and so on. It's clipped to the Linework and Flats folder, so everything you draw in it will only appear superimposed on the linework and the flats of the character.
3) Shading: This folder's blending mode is set to Hard light and contains a layer into which you can paint the shading to fall on the figure. Since it's set to Hard light, you can also paint lighter greys into it to brighten certain areas for greater contrast. It's clipped to the Linework and Flats folder, so everything you draw in it will only appear superimposed on the linework and the flats of the character.
4) Linework and Flats: This folder contains two subfolders, Linework and Paint. These are grouped together in order that the Highlights and Shading folders can be clipped to the figure you draw and colour in the layers of these subfolders.
4a) Linework: This subfolder contains a vector layer in which you can draw the linework that defines your character.
4b) Paint: This subfolder contains a raster layer into which you can lay out the flat colours of your character.
5) Drop Shadow: This folder's blending mode is set to Hard light and contains a layer into which you can paint the shadow cast behind and below the character. It will only affect elements behind the character, such as the background on which the character is standing or sitting.
6) Roughs: This folder contains a raster layer called Sketch, which has its layer colour expression set to the default non-photo blue. Any sketching you do in this layer will appear in blue tones, making it easy to distinguish from the cleanup work you do in the Linework layer. As well, both the folder and layer are set to Draft, enabling you to exclude them without having to actually turn them off when you export your artwork as a single layer at completion.
Related content




Comments: 4

👍: 0 ⏩: 1

👍: 0 ⏩: 1
👍: 0 ⏩: 1
👍: 0 ⏩: 0