HOME | DD
 Spkmw — 3D Origami Penguin Tutorial
Published: 2011-01-20 01:36:20 +0000 UTC; Views: 36219; Favourites: 66; Downloads: 19677
Redirect to original
Description
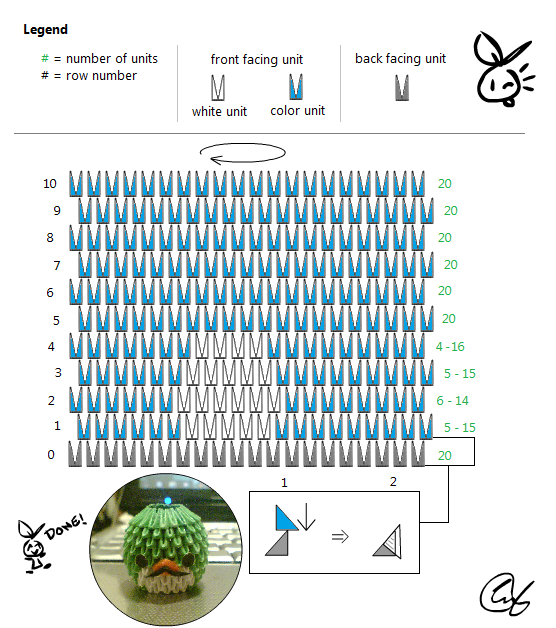
Hello,Here's some instructions to make the very simple penguin everyone loves. (Yes, done with paint and my horrible art skills) You don't have to follow the instructions by the unit. This can be modified depending on how you want your penguin to look like.
For a short and small penguin, make a bigger base and do less rows and vice versa for a tall and skinny penguin. Logic xP
The white base is 1/4 of the total base, then I increase 1 unit, then decrease 1 unit and again in the next row. You can play around with it if you have a bigger base and taller penguin.
These instructions does NOT match my surfing penguin. BUT, if you want to make something similar to it, you can always stare at the picture and count how many rows and what base of white I used...

Now...ENJOY~
--------------------------
Important Note:
These instructions are made to reproduce a 2.5cm tall penguin. If your units are 1cm tall or more, it is recommended to have a starting base of at least 25.
--------------------------
Base: 20 u
Rows: 10
white: 40 u
color: 160 u
Total: 200 u
Related content






Comments: 54

Nice! Gonna make this for my friend's birthday

👍: 0 ⏩: 0

This is my final question: I want a penguin the same size as the one in the picture. Can you please give me the layer numbers for that because I am confused

👍: 0 ⏩: 1

If you follow this tutorial by the unit and by the rows, you should be able to make one exactly the same as the one in the picture. The layer numbers are on the diagram in black (10 rows, and one hidden if you want to make a more stable penguin)
And as I replied to your other posts, It's the 128 units per sheet that I used.
These units are the usual unit size I used. It is rare that I use bigger or smaller units.
Hope this helped.
👍: 0 ⏩: 0
I am sorry, but how does layer 0 come in? 20 and then 15 doesn't work...
👍: 0 ⏩: 1
After the support row, add 15 colored units followed by 5 white. This way, it follows. (Same as one of your other questions)
👍: 0 ⏩: 0
It is a support row to help you align your penguin properly. Because sometimes, when you assemble the model, units become crooked. So this extra row prevents this from happening.
👍: 0 ⏩: 0
Also, you say 15 units on the second row and so on but you show 20 in the picture? How do I lose some units?
👍: 0 ⏩: 1
on the right hand side, the numbers shows how many colored units AND white units. If you add them up, it comes up to 20 units per row. So the row that has 15 meant: 15 colored followed by 5 white (for the stomach)
👍: 0 ⏩: 0
I have a question: What did you use to make the beak of the penguin in the picture? I understand the eyes are paper but what is the beak and mustache made of?
👍: 0 ⏩: 1
It's made with felt. I cut out a beak shape and the mustache is somewhat the same. I cut two strip of felt and twisted it with a bit of glue so that is stays to form a mustache. I glued them together on the penguin.
👍: 0 ⏩: 0
It's alright, if you got anymore questions, don't hesitate to ask
👍: 0 ⏩: 0
I mean I understand how to make the sections of the base but not to join them...
👍: 0 ⏩: 0

I want to try to do this so badly ;A; <3
It's so cute ~
👍: 0 ⏩: 1
Do it!
No one's going to stop you, in fact, this tutorial here is made to encourage people to make one or....an entire army!
👍: 0 ⏩: 1
Do post it once you are done
I'd love to see the results!
👍: 0 ⏩: 1
HEY I DID IT
[link]
Well, I tried LOL

👍: 0 ⏩: 0

sorry for all the questions, but to make your pieces, do you cut the paper into 32 pieces or 16? I am guessing 32...
👍: 0 ⏩: 2
Haha, sorry, but im the kind of person that makes my units tiny. I make 128 units with one sheet.
But normal people use either 16 or 32. Up to you.
👍: 0 ⏩: 0
oh never mind I just found that you said 128 pieces. Wow!:0 That's so small but it makes a cuter penguin so its all good.
👍: 0 ⏩: 0

if we have a base of 25, should we add 5 more units to both the number of colored and white units? c:
👍: 0 ⏩: 1
Hm, not quite, and that would make a base of 30units if you add 5u to both?
I tried it myself with units 25-30u. I ended up having 7 white units and 20 colored units (27 total) and thought it looked best like that. Then again, it does come down to having approx 1/4 of total base units for the white.
Hope that helps.

👍: 0 ⏩: 2
oh! so did the penguin with the 27u base came out as round as this one?
👍: 0 ⏩: 1
Yep! I can make it look like the surfing penguin too if I added more rows on top.
👍: 0 ⏩: 0
thank you so much! C: it worked but umm i guess my units were a little too big
👍: 0 ⏩: 1
oh, no wonder! I can make 128 units with one normal printer paper.
Good thing it worked out well
But I'm still surprised that units much bigger than mine would still work out fine! I must try it myself!
👍: 0 ⏩: 0

What's the measurement of the rectangles you use to make the units? I tried with 3.5cm x 5.5cm and it seems to big.
👍: 0 ⏩: 1
They are around 1.8 x 2.8cm
My units are pretty small. For that exact penguin, I think it was only a few milimeters smaller (1.5 x 2.5cm)since I used different type of paper.
👍: 0 ⏩: 1

-Lip trembles- there goes my idea of trying out 3D origami that just went right over my head 3:
👍: 0 ⏩: 1

3: it looks to hard, plus i have no idea how to read/understand thoes instructions lol
👍: 0 ⏩: 0

Heyy, it's me again. C: I am following this amazing tutorial you made and whenever I try to put the colour pieces on, it slips right off so easy and I'm afraid of I glue it together, I might mess up the whole thing and I have to start from scratch :/
👍: 0 ⏩: 1
What is the dimensions of your units? Maybe it's too small? or maybe just the paper too...smooth? Moving it too much can mean trouble too.
I don't think it can be messed up if you do it the usual way, as in, don't stress the units, don't let it too loose either, don't let them go crooked. Be more confident, i'm sure that it'll look good.
I mean, how bad can you mess up a ...sort of round ball penguin? x)
👍: 0 ⏩: 1
The number of units, is the same as your description. ^^ 40 whites pieces and 160 black pieces. I use cardstock paper
👍: 0 ⏩: 0


Yep, totally!
So if you ever need some juggling balls, this is what you could probably use x)
👍: 0 ⏩: 0


Ohh, is that how you make your origami sit straight? 
👍: 0 ⏩: 1
If you're talking about the base, yes. It's a nice way to line up the first row.
So folding the extra bottom row is worth it because it makes it prettier ans easier to line up
👍: 0 ⏩: 0

Thaaanks for the tutorial
I have a question, Do we have to do 40 white modules or 20?
👍: 0 ⏩: 1
40, 20 for the back base that will support your first row (unless you want to use color units, but you won't see it unless you pick it up and look down. So I used white because it's easy to find white papers) and another 20 for the stomach.
👍: 0 ⏩: 0


ah so cute! the instruction is nicely done.
I'm gonna attempt to make one and put it on my bookshelf
👍: 0 ⏩: 1
Really?
Awesome!
Show me a picture when you'll be done!
👍: 0 ⏩: 1
| Next =>