HOME | DD
 TransformAndConquer — Optional Boss - T Memory PS

#boss #centre #character #dx #guard #journey #memory #night #oc #optional #original #present #ps #selena #species #sphinxette #t #s #p #valnaxi #jttcos
Published: 2019-04-21 05:28:07 +0000 UTC; Views: 404; Favourites: 1; Downloads: 0
Redirect to original
Description
After defeating Wolfie, the duo are asked by her to find something for the pups to eat due to the recent food shortages. However, they get no direct leads as to how to accomplish this. If they ask around in Roguetown Port, the natural place to find such food, they will find that their food reserves are running too low to help, but the manager of the Roguetown Arcade was apparently using an enormous cake as a prize for the first one to beat the newest game in the arcade. If one were to be perceptive, they would know that the Roguetown Arcade was in Roguetown, and Roguetown was previously the site of Dobinxette's inhalation spree...As such, the duo must use Trixie to return to Dobinxette's body, where surely enough they find the arcade manager with the other 'residents' of Dobinxette's body. Conveniently, he has managed to salvage the arcade machine, and has also somehow managed to keep the cake as well, and says that since the duo want it so bad, they may as well give it a go while they are here.
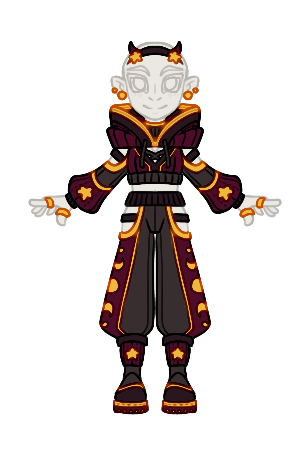
However, upon activating the 'game', the arcade machine springs to life, and holographically projects two blocky figures into reality. After the bright light fades, these two figures are revealed to be T Memory versions of Present Night Guard and Selena, and promptly attack the real duo...
While T Memory P and T Memory S are two separate entities that must both be KO'd to win, they do not attack separately. Instead, they each have one attack turn, and always attack together. This means that whenever one of them is KO'd, the other T Memory will instantly revive them without spending their turn. This makes it important to damage both of the T Memories, instead of just focusing down one of them. The T Memories have a number of attacks.
Their first attack is to use the Rally Ball attack, where the initiating Memory will kick the Rally Ball at their real counterpart, who must hit it away with a hammer counter. This hits it to the other Memory, who will then kick it at their counterpart, who then hits it back to the first Memory. This back-and-forth continues until the second Memory kicks the Rally Ball back to the first Memory, who then ends the attack with a powerful kick at their counterpart, who must jump over this kick instead of hitting it away. Being hit by a regular kick does not end the attack, and simply has the same effect as hitting the ball away. The final kick can trip if it hits. Later in the battle, the Rally Ball will be slightly faster.
Their second attack is to use the Fire Heart attack, where the two Memories will take turns hurling fireballs at the duo, who must jump over them to avoid them. If the attacking Memory throws a fireball low to the ground, it will be aimed at their real counterpart. If they throw it higher into the air, it will be aimed at the other character. Eventually, the two Memories will both start throwing fireballs simultaneously and only at their counterparts, requiring both of the duo to rapidly jump over them at the same time to avoid them. If this attack hits, it can deal the 'Burning' status effect. Later in the battle, their rate of fire will be faster and the attack will last longer.
Their third attack is to use the Jump Helmet attack, where T Memory S will wear a Jump Helmet on its head, which T Memory P will use to bounce off and gain height. The number of times it bounces indicates how many times it will attack. After this, it will bounce off the Jump Helmet and onto one of the duo, who must hit it away with a hammer counter, hitting it back at the Jump Helmet and causing it to bounce. If T Memory P flips in the jump, Present Night Guard is the target. It if spins, Selena is the target. After the last jump, hitting it with a hammer counter will instead hit it into T Memory S, damaging both of them and ending the attack. Later in the battle, T Memory P will jump more times.
Their fourth attack is to use the Guess-Who Gun attack, where the two T Memories will jump into the cannon and briefly reveal their arrangement, before firing each barrel in a clockwise fashion. Just as with the duo, there will be four of each Memory in various patterns. If the cannon fires directly at the duo, the character matching the current Memory will be the target. If the cannon fires upwards, the other character will be the target. The duo must hit the Memories back at the cannon to avoid being hit, which gradually damages the cannon, eventually destroying it after all Memories have been fired and ending the attack. Later in the attack, the cannon fires faster and can fire in an anti-clockwise fashion.
Their fifth attack is to use the Bloat Heart attack, where T Memory S will bloat to a large size, before T Memory P bounces it into the air, causing it to fall on the duo. As it falls, it will rotate, either ending up with its head on top, in which case Present Night Guard is the target, or on the bottom, in which case Selena is the target. The targeted character must hit T Memory S back at T Memory P, causing it to simply bounce T Memory S into the air again. Eventually, T Memory P will launch T Memory S high into the air, causing it to fall on one of the duo, who must hit it up into the air, after which it will then bounce on the other character (regardless of whether or not the first character hit it), who must hit it away and end the attack. If this attack hits, it can deal the 'Dizzy' status effect, and the last two hits deal heavy damage if they hit. Later in the attack, T Memory S will spin more erratically and will fall faster.
Their sixth attack is to use the Rainbow Heart attack, where T Memory S will briefly become invincible and quickly dash across the screen at the duo, requiring the target to jump over it as it passes. Jumping on it or being hit will send that character flying, taking heavy damage and possibly suffering the 'DEF-Down' status effect in the process, but also removing them from the attack. Occasionally, T Memory P will throw boost pads in front of one of the duo, causing T Memory S to switch targets to that character mid-dash, and sometimes T Memory S will skid to a stop just in front of the target and jump over them, requiring them to not jump. Later in the battle, this attack lasts much longer.
Their seventh attack is to use the Minion Menagerie attack, where they will summon a T Memory version of Princess Sphinxella, which will direct a large group of ANUu to charge at the duo, who must jump over them as they attack. Landing on an ANU will KO it and remove it from the attack. Occasionally, an ANU will be lit on fire, causing one of the T Memories to hit it at the duo with a hammer, requiring the matching character to hit it away with a hammer counter. If a charging ANU hits, it can trip, and if a flaming ANU hits, it can deal the 'Burning' status effect. Later in the attack, more ANUu will charge, more of them will be lit on fire and the attack will be slightly faster.
Their eighth attack is to use the Snack Heart attack, where the initiating T Memory will throw the Snack Heart above the duo, causing blocky snacks to fall on them, requiring them to hit the snacks away with hammer counters. If these snacks hit, they deal slight damage due to their blocky nature. Hitting them away hits them at T Memory S, which will 'eat' them. After this, T Memory S will bloat to an enormous size, and T Memory P will strain to lift it into the air before throwing it upwards and promptly fleeing. T Memory S will then fall and send out a massive shockwave which the duo must both jump over. If T Memory S lands in front of both of the duo, they must jump at the same time, but if it lands in front of one of them, that character must jump before the other, as the shockwave reaches them first. If the shockwave hits, it will launch that character into the air, dealing heavy damage and possibly tripping them upon landing. Later in the battle, more snacks will fall, and the shockwave will be faster and more powerful.
Their ninth attack is to use the Mighty Meteorite attack, where the two T Memories will jump up to a meteor and cause it to crash down on the duo, requiring both of them to smash it with a hammer counter at the same time. If only one of them hits, the meteor will not break and instead hit both of the duo for massive damage. This will repeat several times, with the meteors falling faster each time, as well as moving more erratically in an attempt to throw the duo off. If this attack hits, it will always hit both of the duo for heavy damage, and can deal the 'Dizzy' and 'STAT-Down' status effects at random. Later in the battle, the attack will last longer, and the meteors will be even faster.
If T Memory PS are re-fought in the battle node after completing the side-quest, they gain a new tenth attack, which is to use the Bandanawolf Barrage special attack. First, the T Memories will start by taking turns throwing stars at their real counterparts, who must hit them back at the Memories with hammer counters, causing the stars to bounce off them and up to a larger star above the duo. Once this is finished, the star will begin summoning Bandanawolf Memories, which will charge at the duo, requiring them to jump to avoid them. Due to their size, the duo must jump and bounce off the Bandanawolf Memories' heads in order to gain sufficient height. If a Bandanawolf Memory hits one of the duo, they can trip, and another hit may not cancel the trip, allowing the attack to chain a number of hits. After this, the large star will end the attack by falling on the duo, requiring both of them to smash it with a hammer counter. If this hits, it can deal the 'Dizzy' status effect. Later in the battle, this attack lasts longer.
Once the T Memories are defeated, the arcade manager will stick to his word and gives the duo the cake, which is quite a bit larger than anticipated. Using this to their advantage, they can take it back to Wolfie, who will thank them by giving them full safe passage throughout Gloomwood Forests, as well as giving them the Howlstar, a strange relic that can apparently call a pack of Bandanawolves to the aid of anyone who uses it. Bandanawolves will no longer be able to be battled as the duo, instead becoming passive, and the duo will learn their final special attack: Bandanawolf Barrage.
Wait, is this ANOTHER new boss?! Kinda... I had the idea for them in the original, but it didn't really seem to fit into place anywhere, so it was quickly dropped. However, in the remake these guys give you the last special attack. It's still quite out-of-the-way, since you probably won't think of going back into Dobinxette to find the food for Wolfie, but hey it gives you this battle.
That's a LOT of attacks. And they bear a striking similarity to the duo's special attack roster. Interesting...